ACP Home | Organic Chemistry IOrganic Chemistry II  | Lecture | LaboratoryGeneral Chemistry | Laboratory Syllabus 

Separation & Purification of Components of an Analgesic Tablet
Experimental Procedure


The procedure for this experiment is significantly more complex than any of the previous experiments done to date.  It is extremely important that you come to your lab section prepared, meaning you have read and understood the background information and the procedure.  Work carefully and methodically through the experiment.  Two guiding principles should be followed for this experiment:

Label everything
Do not throw anything away until you are 100% sure you have the desired products in your hands

The procedure is provided in a text format.  A flowchart format is also available which is a summary of the procedure.  Use both of these formats for the most thorough coverage of the experimental procedure.  See "Creating and Using Flowcharts for Experimental Procedures" for more details.

Procedure
Grind four Excedrin tablets to a fine powder using a mortar and pestle (Figure 10).  Weigh the solid and record the weight in your notebook.  Transfer the solid to a 50ml Erlenmeyer flask.  Add 15ml of dichloromethane (CH2Cl2, also called methylene chloride) and a stir bar to the flask.  Clamp the flask to a ring stand and set it on a hot plate/stirrer in the hood.  Begin stirring the mixture.  Gently warm the mixture to just below boiling (CH2Cl2 has a very low boiling point, 40°C) for 5-10 minutes.  All of the solid will not dissolve.


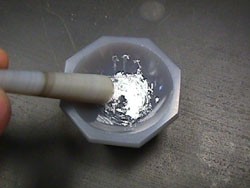
Figure 10:  Mortar & Pestle used for Grinding Tablets

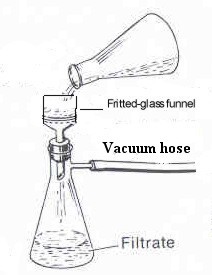
Figure 11:  Vacuum Filtration Apparatus
(adapted from Landgrebe, p. 114)

Filter the solid, while still warm, by vacuum filtration.  Set up a vacuum filtration apparatus as depicted in Figure 11.  Clamp a 125 ml vacuum flask to a ring stand.  Insert a neoprene adapter into the neck of the flask and fit the flask with a Buchner funnel.  Insert a piece of filter paper into the funnel. wet the filter paper with  CH2Cl2.  Attach a vacuum hose (thick-walled; Do not use a thin-walled hose.  It will collapse under vacuum) to the flask and the sink aspirator.  Pour the warmed mixture of Excedrin tablets and CH2Cl2 through the filtration apparatus and allow the solid to sit  in the filter to dry for ~ 5minutes with the vacuum turned on.  The solid in the filter contains tablet binder (non-active ingredient) and acetaminophen (ACE).  Transfer the solid to a 50ml beaker  using a spatula.  Label the beaker “Binder +ACE” with a permanent marker.  Set the beaker aside and allow it to dry for the remainder of the lab period.


back to top

The next part of the procedure is difficult and is described in steps.  Work very carefully and methodically through this crucial part of the experiment. Check off each step as you complete it to keep track of where you are in the experiment.

1.  Add an additional 20 ml of CH2Cl2 to the vacuum flask containing the filtrate to dissolve any residue.
2.  Add 20ml of 5% NaHCO3 to the vacuum flask.
3.  See "How to Handle a Separatory Funnel".  Set up a 125 ml separatory funnel on a ring stand as depicted in Figure 12.
4.  Clamp a metal ring to the ring stand that has a diameter smaller than the diameter of the widest part of a 125 ml separatory funnel.
5.  Insert the 125 ml separatory funnel through the ring.
6.  Transfer the mixture from the vacuum flask to the 125 ml separatory funnel.  Be sure that the stopcock on the funnel is in the closed position
     (perpendicular to downspout) before adding the mixture.  When the mixture is allowed to settle in the separatory funnel, two layers should be
     obvious.  The bottom layer is the organic layer (CH2Cl2) and the top layer is the water layer.
7.  Place a snuggly-fitting stopper in the ground-glass joint at the top of the separatory funnel and shake the funnel so that the two layers are
     thoroughly mixed as depicted in Figure 13.  (Review the information in the background reading on handling the separatory funnel.)
     Return the funnel to the ring stand and allow the two layers to separate.  If an emulsion forms, follow the directions provided in the background
     section of the experiment.  If two layers are not clearly evident even after attempting to break the emulsion, transfer the entire mixture to a 125 ml
     Erlenmeyer flask and gently warm the mixture for ~10 minutes.  Return the warmed mixture to the separatory funnel and allow the layers
     to  separate.
8.  Label two 50 ml Erlenmeyer flasks as “organic layer ” and “water layer”.
9.  Remove the stopper from the top of the funnel and drain the lower layer out of the separatory funnel into the flask labeled “organic layer”.
10.  Drain the top layer into the second Erlenmeyer flask labeled “water layer”.
11.  Close the stopcock on the separatory funnel and return the solution in the flask labeled “organic layer” to the separatory funnel.
12. Add 20 ml of de-ionized water to the funnel, insert the stopper and shake the funnel as shown in Figure 3.14.  Return the funnel to the ring
      stand and allow the two layers to separate.

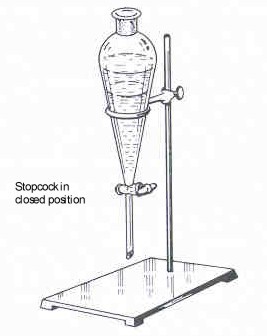
Figure 12:  Separatory Funnel Positioned on the Ring Stand
(adapted from Landgrebe, p. 124)

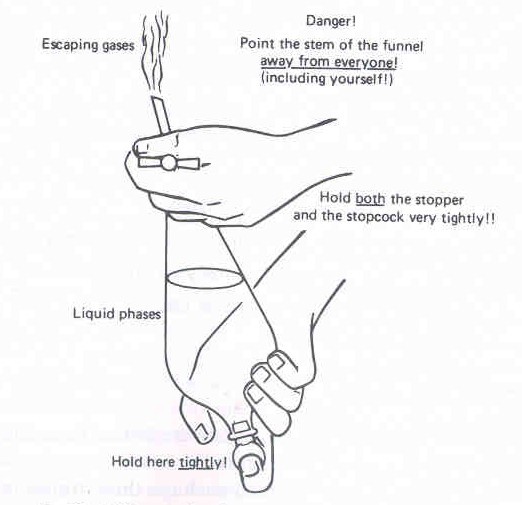
Figure 13:  Shaking a Separatory Funnel
(adapted from Zubrick, p. 161)


13. Remove the stopper and drain the lower layer back into the flask labeled “organic layer”.
14. Drain the top layer into the flask labeled “water layer” (already contains water layer from the first step).  The water layer contains ionized
      aspirin and the organic layer contains caffeine.
15. Add the words “CAF” to the flask labeled “organic layer” and set the flask aside in the hood.
16. Dropwise, add 30% HCl (~6M) solution to the flask labeled “water layer” until a pH of 2-3 is obtained.  Add 5-10 drops, swirl the solution
      and check the pH with ph paper by inserting a glass rod into the solution and touching the end of the rod to the pH paper.  Continue this process
      until a pH 2-3 is reached.  The solution may become cloudy as the pH approaches 2-3.  Add the words “pH 2-3” to the label on the flask when
      you have completed this step.
17. Close the stopcock on the separatory funnel and add the solution in the flask labeled “water layer pH 2-3” to the separatory funnel.
18. Add 20 ml of CH2Cl2 to the separatory funnel insert the stopper and shake the funnel as shown in Figure 13.  Return the funnel to the ring stand
      and allow the two layers to separate.
19. Label a clean, 100ml Erlenmeyer flask “ASA” and drain the lower layer into this flask.
20. Again, add 20 ml of CH2Cl2 to the separatory funnel insert the stopper and shake the funnel as shown in Figure 13.  Return the funnel to the ring
      stand and allow the two layers to separate.
21. Again, drain the lower layer into the same flask labeled “ASA”.
22. Repeat steps 20 and 21 one more time.

TLC Analysis of ASA and CAF
Add 10 ml (or less) of CH2Cl2 to the ASA and CAF flasks to completely dissolve any solids.  Prepare a silica gel TLC plate with five tick marks as described in TLC Analysis of Analgesics.  Label the tick marks 1-5 and construct a table in your notebook as shown in Table 3.2, listing what each tick mark represents.  Spot the plates with each of the two experimental solutions in the flasks labeled ASA and CAF and with known solutions of ASA, CAF and ACE. Develop the plates using the developing solvent that worked best in the TLC Analysis of Analgesics experiment.  When the plate is developed, remove it from the developing chamber and immediately mark the solvent front and label the plate “ASA & CAF”.  View the plate under UV light and circle any visible spots.  Place the TLC plate in an I2 chamber and observe the appearance of spots.  Calculate Rf values for all spots observed.  Tape the plate into the results section of your notebook.

#
Analgesic
1
Experimental ASA
2
Known ASA
3
Experimental CAF
4
Known CAF
5
Known ACE

Table 2:  TLC Analysis of ASA and CAF

At this point the three active constituents of Excedrin are separated.  Collect the two flasks, labeled “CAF” and “ASA” and the watch glass labeled “Binder + ACE”.  Cover the flasks with paraffin and set them in your lab drawer until next week.  Transfer the solid on the watch glass to a vial using a spatula.  Label the vial “Binder + ACE” and place the vial in your lab drawer until the second week of the experiment.


End of Week 1

back to top

Remove the three products from your lab drawer.  The CH2Cl2 solvent will likely have evaporated from the CAF flask and the ASA flask, and you may be left with a solid.  However, some solvent may still remain.  The solid mixture of binder and ACE should be very dry.

TLC Analysis and Isolation of ACE
Transfer the solid “Binder + ACE” in the vial to a 50 ml Erlenmeyer flask, using a spatula.  Add a magnetic stir bar and 15 ml of ethanol to the flask.  Place the flask on a hot plate/stirrer and begin stirring.  Gently warm the mixture just below boiling for ~10 minutes.  (All of the solid will not dissolve.)  Set up a vacuum filtration apparatus as shown in Figure 11 and filter the solid (binder) from the filtrate (solution of ACE in ethanol).  Label the vacuum flask containing the filtrate “ACE”. Prepare a TLC plate with 4 tick marks.  Label the tick marks 1-4 and construct a table in your notebook as shown in Table 3.3, listing what each tick mark represents.  Spot the plates with the experimental solution of ACE and with known solutions of ACE, ASA and CAF.  Develop the plates using the developing solvent that worked best in the TLC Analysis of Analgesics experiment.    When the plate is developed, remove it from the developing chamber and immediately label the plate “ACE” and mark the solvent front.  View the plate under UV light and circle any visible spots.  Place the TLC plate in an I2 chamber and observe the appearance of spots.  Calculate Rf values for all spots observed.  Tape the plate into the results section of your notebook.

#
Analgesic
1
Experimental ACE
2
Known ACE
3
Known ASA
4
Known CAF

Table 3:  TLC Analysis of ACE

Place the vacuum flask containing ethanol and ACE on a hot plate/stirrer.  Add a magnetic stir bar, begin stirring and gently heat the solution to evaporate ~2/3 of the ethanol.  Remove the flask from the heat and allow it to cool to room temperature.  Clamp the flask to a ring stand and set the flask in an ice bath.  Proceed with the remainder of the experiment.  Check the mixture after ~30 minutes.  A solid (ACE) should precipitate from the solution.  Carefully decant off any remaining ethanol.  Weigh a watchglass and record the weight in your notebook.  Transfer the solid to the pre-weighed watch glass labeled “ACE” and set it aside.


Isolation of ASA and CAF
Add ~10 ml (or less) of CH2Cl2 to each of the flasks labeled “ASA” and “CAF” to dissolve all solids.  Add ~200-300mg of magnesium sulfate (MgSO4) to the flasks and swirl the flasks to allow the MgSO4 drying agent to absorb any water in the mixtures.  Use gravity filtration to remove the drying agent from the flask, as depicted in Figure 14.  Label two clean and dry 50 ml Erlenmeyer flask “ASA” and “CAF” and clamp the neck of the flask labeled “ASA” to a ring stand.  Insert a glass funnel, equipped with filter paper into the neck of the flask (Figure 14).  Swirl the flask containing the ASA solution and the MgSO4 and quickly pour the mixture through the filtration apparatus to collect the drying agent in the filter paper.  Place the flask labeled “ASA” (contains the filtrate or the solution of ASA in CH2Cl2) on a hot plate stirrer.  Add a magnetic stir bar to the flask, begin stirring and gently warm the mixture to remove all but ~5 ml of the CH2Cl2.  Remove the flask from the heat, set it aside, and allow it to cool down.  The remaining CH2Cl2 should evaporate leaving a solid residue which is aspirin (ASA).

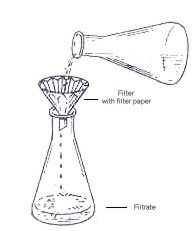
Figure 14:  Gravity filtration
(adapted from Landgrebe, p. 113)


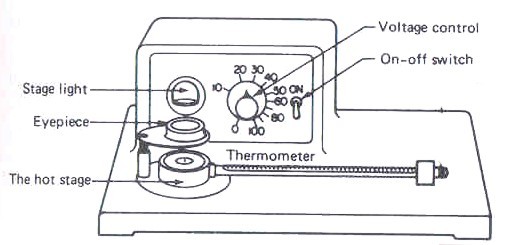
Figure 15:  Fisher-Johns Melting Point Apparatus
(adapted from Zubrick, J.W., p. 109)

Repeat the above procedure for the CAF flask. Add ~200mg of MgSO4 to the flask and swirl the flask to allow the MgSO4 drying agent to absorb any water in the mixture.  Use gravity filtration to remove the drying agent from the flask, as depicted in Figure 3.14.  Label a clean and dry 50 ml Erlenmeyer flask “CAF” and clamp the neck to a ring stand.  Insert a glass funnel, equipped with filter paper into the neck of the flask.  Swirl the flask containing the CAF solution and the MgSO4 and quickly pour the mixture through the filtration apparatus to collect the drying agent in the filter paper.  Place the flask labeled “CAF” (contains the filtrate or the solution of CAF in CH2Cl2) on a hot plate stirrer.  Add a magnetic stir bar to the flask, begin stirring and gently warm the mixture to remove all but ~5 ml of the CH2Cl2.  Remove the flask from the heat, remove the stir bar and set the flask aside.  Allow the flask to cool down.  The remaining CH2Cl2 should evaporate leaving a solid residue that is caffeine (CAF).


Percent Recovery of ASA, CAF and ACE
Weigh the watchglass containing the solid ACE.  Subtract this weight from the weight of the watchglass (determined previously) to determine the mass of recovered ACE.  Transfer the ACE to a small vial, labeled with your name and ACE.

Weigh each of the flasks containing ASA and CAFand record the weights.  Transfer the ASA and CAF from the 50 ml flasks to two small vials labeled with your name and ASA on one, and your name and CAF on the other.  Wash and thoroughly dry the two flasks in the oven (~5-10min) Weign each clean, dry flask and substract this weight from the weight of the flask + ASA or flask + CAF to determine the masses of the recovered analgesics.  Record the weights in the results section of your notebook.

Calculate the percent recoveries of each analgesic from the tablets and record the percent recovery, and your calculations in your notebook.


Melting Point Determinations of ASA, CAF and ACE
Transfer 1-3mg of each solid to a glass, melting point cover slip.  Place a second cover slip over the material and carefully slide the two slips around to evenly distribute the solid over the surface between the plates.   Carefully place the cover slips on the melting point apparatus (Figure 3.15), set the dial to ~40 and turn the instrument on.  Monitor the temperature on the thermometer of the apparatus and the state of the solid. Record the temperature range over which the solid melts in the results section of your notebook.  For more information on how to run a melting point determination, see the General Chemistry I website.

Hand in your product.  Label with your name, the compound name and the date.

Waste Disposal
Hand in your  isolated ASA, CAF and ACE when you are completely finished Dispose of excess CH2Cl2 in the halogenated organic waste container.
Dispose of used filter paper and MgSO4 in the solid waste container.
Dispose of excess ethanol, ethyl acetate or hexane in the non-halogenated organic waste container.
Dispose of excess 30% HCl in the acidic aqueous waste and the 10%NaHCO3 can be disposed of down the drain.

References
Feiser, L.F.; Williamson, K.L. Organic Experiments, 8th Edition, Houghton Mifflin Co.: New York, 1998.
Zubrick, J.W. The organic Chem Lab Survival Manual, 4th Edition, John Wiley & Sons: New York, 1997.
Landgrebe, J.A. Theory and ractice in the Organic Chemistry Laboratory, 4th edition, Brooks/Cole Publishing Co.: Pacific Grove, CA, 1993.