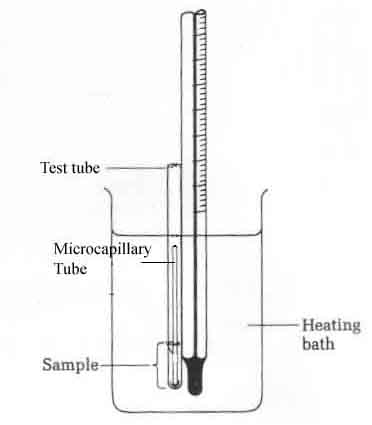
Figure 1: Boiling Point Apparatus
(adapted from Feiser & Williamson)
A small scale boiling point apparatus (depicted in Figure 1) will be used to determine the boiling point of the product. This apparatus may be set up for you, or you may be required to construct it yourself. To set up the apparatus, place a 150mL beaker on a hot plate. Fill the beaker approximately ¾ full with either tap water or silicon oil, depending on the reported boiling point of the compound you are analyzing. Silicon oil should be used for compounds with boiling points reported to be 95°C or higher; water is sufficient for compound with boiling points below 95°C. Set up a ring stand or use the rack in the hood next to the hot plate. Attach a ring to the ring stand/rack and carefully hang a thermometer to the ring using a bent paper clip inserted through the loop of the thermometer and hooked over the ring securely. Set the height of the thermometer approximately 1 inch from the bottom of the beaker. Do not allow the thermometer bulb to touch the bottom of the beaker! Using a rubber band, attach a test tube (3mm diameter X 80 mm length) to the thermometer. Line up the bottom of the test tube with the bottom of the thermometer bulb. Dispense ~200ul of your organic compound into the test tube using an Eppendorf pipette. Snap off approximately 1 inch from the open end of a melting point capillary tube and insert the tube, open end down, into the test tube, so that the top of the capillary tube is completely inside the test tube. Check your set up against the set up shown in Figure 1 to be sure it looks the same as the diagram before you begin heating.
Turn on the hot plate and begin to heat the water/silicon oil bath. As the sample becomes hot and approaches its boiling point, air bubbles will begin to escape from the melting point capillary tube, inside the test tube. When a steady stream of bubbles emerge from the capillary tube, turn off the heat. Watch the liquid in the test tube carefully, and record the temperature on the thermometer at which the liquid begins to rise up into the capillary tube (Temperature #1). Turn the heat back on and record the temperature at which a steady stream of bubbles begin to emerge again (Temperature #2). The range from the lower temperature (#1) to the higher temperature (#2) is the boiling point range of your compound.